
When it comes to winter, flooding is, for most, not the first word that comes to mind. And it certainly doesn’t carry any enjoyable connotations unless, of course, you number yourself among the rough-and-tumble type, the rabble of stark-raving-mad and proud, outdoor-hockey-playing Canadians. For them – for us – flooding is the first word, the last word, and every word in between from the moment the mercury dips below zero to the spring thaw when the last of winter withers away. It is in a word: religion, to be practiced, preached and kept pristine. It is art. It is Zen with more snow.
Anyone who has ever created an outdoor ice surface already knows that long hours, careful experimentation and regular grooming of your ice go a long way to creating that perfect surface. There has been a steady rise of outdoor pond hockey events; Montreal proudly boasts a return to its roots with the appearance of The Montreal Pond Hockey Festival, heading into its 4th year, and even the NHL has conceded to history, creating the Winter Classics series, currently playing a half-dozen games outdoors on frozen football fields and stadiums.

Many of our childhood’s memories are filled with thoughts of playing on a homemade rink out on the lake, in our backyards, at the local park. The vivid moments usually include the bone-chilling cold that caused our cheeks to glow red, the steam to rise off of ours heads and the sting in our nostrils. The labour that actually went into building up these surfaces seemed like magic as if nature just happened to create a perfectly smooth skating surface day in and day out. Truth is, here’s nothing magical about the time and care that goes into a great rink, and you can always count on Mother Nature to find a way of playing her own game with your precious surface. Still feeling up to the task? Here’s how you can build your own rink and continue to carry on a tradition that is deeply rooted in our heritage.
Building Your Rink
Getting Started
The first consideration is always safety. When dealing with a natural water surface such as a pond, lake or river, you’ll need about 16” of thickness in the ice to skate safely. Using an auger, drill a small hole as close to center of the surface area you intend on using and measure.
Clearing The Area
For natural surfaces you’ll only need to clear away the snow and debris that have fallen on the area. With either a shovel or a snowblower, clear the snow until only a very thin layer remains. This is critical or the water will freeze over the snow creating what is called a false ice, which is usually white or cloudy.
The Boards
For those of you building on a pond or lake boards are optional. With that said, now is the time to install them if you want them. You can use a variety of materials, plywood, two-by lumber or custom thermoplastics, your budget will dictate both the quality and the lifespan of your boards. We recommend that you use boards with a minimum width and height of 2” X 15” or 2” X 18″ as a minimum to reduce the amount of time you spend looking for pucks. Be sure to brace them properly and remember, a few dollars now will save you plenty of headaches later in the season.
Ideal Temperatures
Once the snow has been cleared, it’s time to wait for the ideal temperature, which is typically between -5 and -15°C. It’s better to water at night. During the day the sun casts off inconsistent heat which prevents the water from freezing evenly across its surface. For a smooth surface you should also avoid watering on windy nights as large gusts of wind can cause unwanted ripples in your ice surface.
The First Flood
When Mother Nature has set the ideal conditions, get out there and take advantage of them. Water the entire surface thoroughly and evenly. If you are building your rink on or near a river or a lake you can use the body of water as a water source by drilling through the ice and using a pump to draw water. Keep the water from the hose as close to the surface of the rink as possible, laying down a thin layer across the whole surface. Think like a Zamboni: thin layer on top of thin layer and remember you’re building a hockey rink not a swimming pool. Focus on levelling the surface and filling in any cracks or gaps to help freeze the boards in place. Your ice should be nice and clear; cloudy ice is poor ice. Flooding an area the size of a football field will easily take three to five hours; a personal sized rink, about half that. Don’t be surprised if you look like an ice sculpture after your first time out, so dress warmly and layer up.
Backyards
When building a backyard rink, start by laying down a layer of plastic. When the weather is right, flood the surface to a depth of four inches. Then proceed as above.
Maintenance
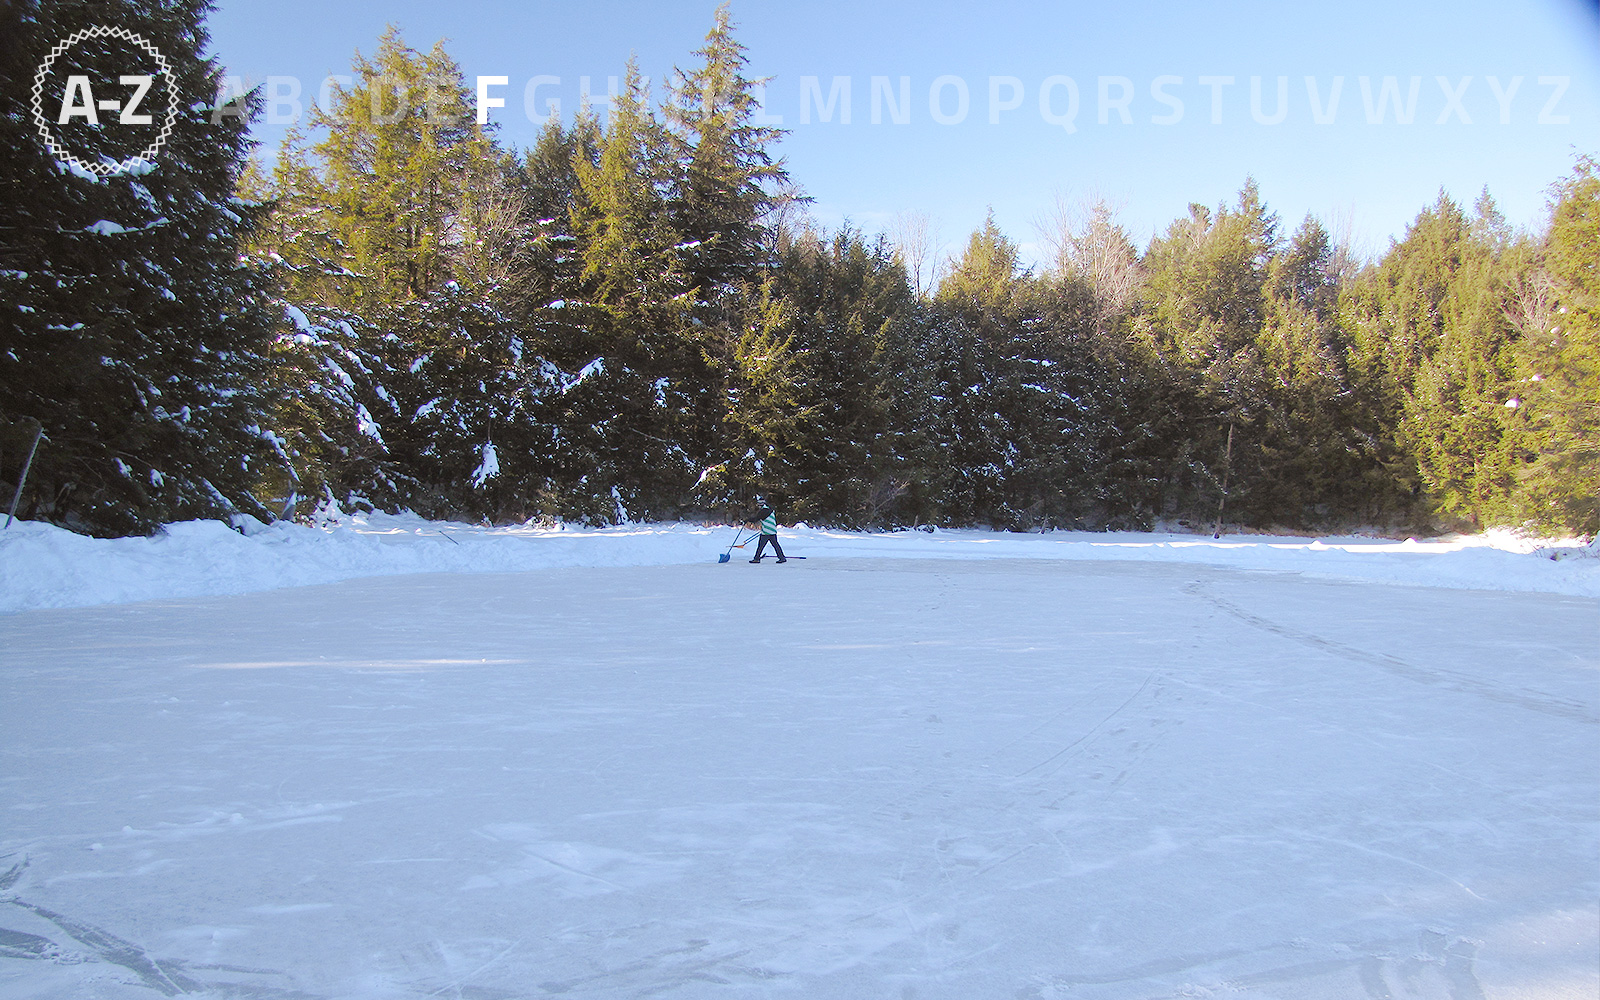
It’s Canada. It’s going to snow. Be sure to clear the snow from the ice surface early and often. Fresh snow will often bond to the ice surface, resulting in rough patches that will throw your skates off. The longer you wait before cleaning off the snow the harder it will become.
With each use, and depending on your level of OCD, you’ll want to keep the surface as smooth as, ergh, ice. The trick here is to spread a thin layer of water to freshen the ice up, but do not overdo it. I repeat, DO NOT OVERDO IT.
Remember, this is outdoor hockey on a natural surface. It’s not as easy to manage as an arena. Lakes, rivers and Mother Nature have their own minds when it comes to the freezing and any number of things can affect your ice quality. The more attention you give to your rink, the better it’ll treat you.
Safety should never be ignored.
If you are building your rink on a river or lake, safety precautions must be taken. Again, the ice should be at least 16 inches thick to support a hockey game and it should be checked every day. You can do this by using an auger to drill through the ice and then measuring. Watch the colour of your ice: Blue ice is the strongest, white ice is roughly half as strong and grey ice is weak ice and should probably have a danger sign on it.
When it comes to winter, flooding is, for most, not the first word that comes to mind. And it certainly doesn’t carry any enjoyable connotations unless, of course, you number yourself among the rough-and-tumble type, the rabble of stark-raving-mad and proud, outdoor-hockey-playing Canadians. For them - for us - flooding is the first word, the last word, and every word in between from the moment the mercury dips below zero to the spring thaw when the last of winter withers away. It is in a word: religion, to be practiced, preached and kept pristine. It is art. It is Zen with more snow.
Anyone who has ever created an outdoor ice surface already knows that long hours, careful experimentation and regular grooming of your ice go a long way to creating that perfect surface. There has been a steady rise of outdoor pond hockey events; Montreal proudly boasts a return to its roots with the appearance of The Montreal Pond Hockey Festival, heading into its 4th year, and even the NHL has conceded to history, creating the Winter Classics series, currently playing a half-dozen games outdoors on frozen football fields and stadiums.
Many of our childhood’s memories are filled with thoughts of playing on a homemade rink out on the lake, in our backyards, at the local park. The vivid moments usually include the bone-chilling cold that caused our cheeks to glow red, the steam to rise off of ours heads and the sting in our nostrils. The labour that actually went into building up these surfaces seemed like magic as if nature just happened to create a perfectly smooth skating surface day in and day out. Truth is, here’s nothing magical about the time and care that goes into a great rink, and you can always count on Mother Nature to find a way of playing her own game with your precious surface. Still feeling up to the task? Here’s how you can build your own rink and continue to carry on a tradition that is deeply rooted in our heritage.
Building Your Rink
Getting Started
The first consideration is always safety. When dealing with a natural water surface such as a pond, lake or river, you’ll need about 16” of thickness in the ice to skate safely. Using an auger, drill a small hole as close to center of the surface area you intend on using and measure.
Clearing The Area
For natural surfaces you’ll only need to clear away the snow and debris that have fallen on the area. With either a shovel or a snowblower, clear the snow until only a very thin layer remains. This is critical or the water will freeze over the snow creating what is called a false ice, which is usually white or cloudy.
The Boards
For those of you building on a pond or lake boards are optional. With that said, now is the time to install them if you want them. You can use a variety of materials, plywood, two-by lumber or custom thermoplastics, your budget will dictate both the quality and the lifespan of your boards. We recommend that you use boards with a minimum width and height of 2” X 15” or 2” X 18" as a minimum to reduce the amount of time you spend looking for pucks. Be sure to brace them properly and remember, a few dollars now will save you plenty of headaches later in the season.
Ideal Temperatures
Once the snow has been cleared, it’s time to wait for the ideal temperature, which is typically between -5 and -15°C. It’s better to water at night. During the day the sun casts off inconsistent heat which prevents the water from freezing evenly across its surface. For a smooth surface you should also avoid watering on windy nights as large gusts of wind can cause unwanted ripples in your ice surface.
The First Flood
When Mother Nature has set the ideal conditions, get out there and take advantage of them. Water the entire surface thoroughly and evenly. If you are building your rink on or near a river or a lake you can use the body of water as a water source by drilling through the ice and using a pump to draw water. Keep the water from the hose as close to the surface of the rink as possible, laying down a thin layer across the whole surface. Think like a Zamboni: thin layer on top of thin layer and remember you’re building a hockey rink not a swimming pool. Focus on levelling the surface and filling in any cracks or gaps to help freeze the boards in place. Your ice should be nice and clear; cloudy ice is poor ice. Flooding an area the size of a football field will easily take three to five hours; a personal sized rink, about half that. Don’t be surprised if you look like an ice sculpture after your first time out, so dress warmly and layer up.
Backyards
When building a backyard rink, start by laying down a layer of plastic. When the weather is right, flood the surface to a depth of four inches. Then proceed as above.
Maintenance
It’s Canada. It’s going to snow. Be sure to clear the snow from the ice surface early and often. Fresh snow will often bond to the ice surface, resulting in rough patches that will throw your skates off. The longer you wait before cleaning off the snow the harder it will become.
With each use, and depending on your level of OCD, you’ll want to keep the surface as smooth as, ergh, ice. The trick here is to spread a thin layer of water to freshen the ice up, but do not overdo it. I repeat, DO NOT OVERDO IT.
Remember, this is outdoor hockey on a natural surface. It’s not as easy to manage as an arena. Lakes, rivers and Mother Nature have their own minds when it comes to the freezing and any number of things can affect your ice quality. The more attention you give to your rink, the better it’ll treat you.
Safety should never be ignored.
If you are building your rink on a river or lake, safety precautions must be taken. Again, the ice should be at least 16 inches thick to support a hockey game and it should be checked every day. You can do this by using an auger to drill through the ice and then measuring. Watch the colour of your ice: Blue ice is the strongest, white ice is roughly half as strong and grey ice is weak ice and should probably have a danger sign on it.
Special thanks to Ian Tamblyn, musician and honorary ice whisperer.