

Stylist / Leslie Woods
Producer / Lindsay Woods
Assistant / Safia Soori
The Definitive Guide to Shoe Cleaning & Care
It doesn’t matter if you’re rocking fresh high-tops, desert boots or dapper brogues, if you care about your footwear, care for your footwear.
By regularly taking the time to treat and condition your shoes you will increase their longevity and performance while also keeping them looking their best. Waterproofing and conditioning your shoes will keep the leather supple and your feet feelin’ fine through spring showers to summer thunderstorms.
Taking proper care of your shoes is an important craft; shoe shine boys and cobblers once lined the corridors of great train stations and busy metropolitan streets, but no more. Like so many things: if you want something done right, you’ve got to do it yourself. We’ve found cleaners and conditioners, natural waxes and oils, synthetic waterproofing sprays and even some household items with little known alternative uses. We have assembled a whole range of the tools and products you will need to take care of everything from your sneakers to your premium leather and suede boots. There are few things as unpleasant as wet feet, so follow along as we run through four simple steps of basic shoe cleaning and care.
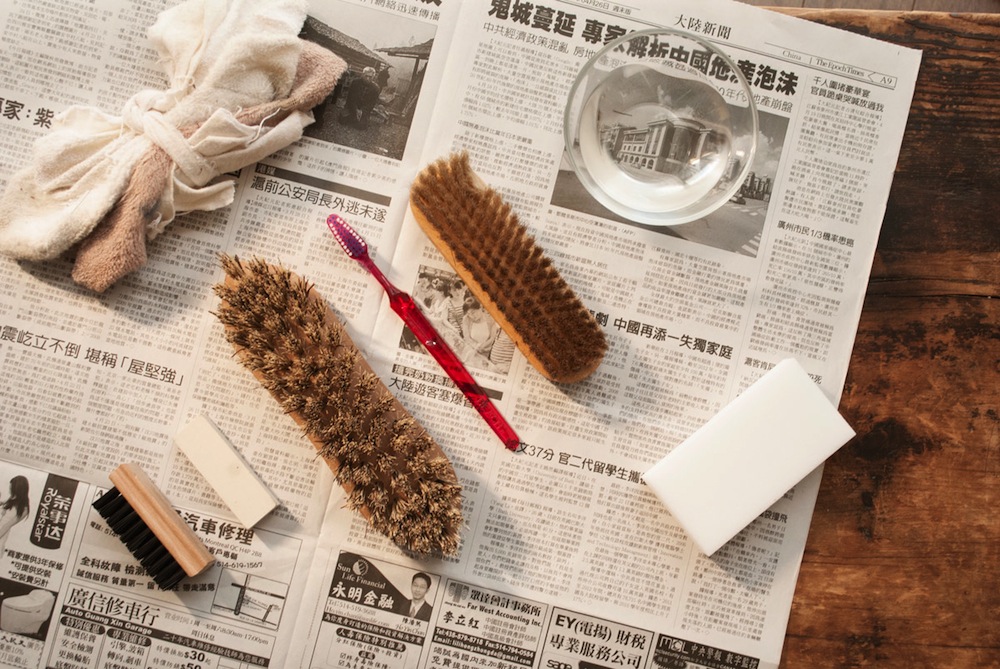 Magic Eraser – Mr. Clean, Revivex Suede Brush and Block – Gear Aid: Nubuck, Suede and Fabric Boot Care kit
Step 1: Remove debris and dirt.
Before even starting to clean your shoes, make sure they are thoroughly dried out. Stuff them with newspaper overnight to make sure they are bone dry and ready to accept all the nourishing conditioners we are about to apply. Once your shoes are dry, take out the laces so that you can get into all the creases and crevices. Begin to remove any surface dirt with a stiff brush; you will want to pay special attention to seams and stitching, these are the spots where mud and dust can work their way into the shoe and cause added wear and abrasion.
Mr. Clean Magic Erasers are ideal for athletic shoes (Jordans); believe it or not, they are crazy good for removing superficial stains and scuff marks from smooth leathers. If you’re working on suede or nubuck, stick with a brush and block. Be sure to pay attention to the grain of the material (aka the nappe); for stubborn scuff marks and worn in dirt you will want to brush against the grain, to raise the nappe and release the offending dust and grime with the rubber suede block.
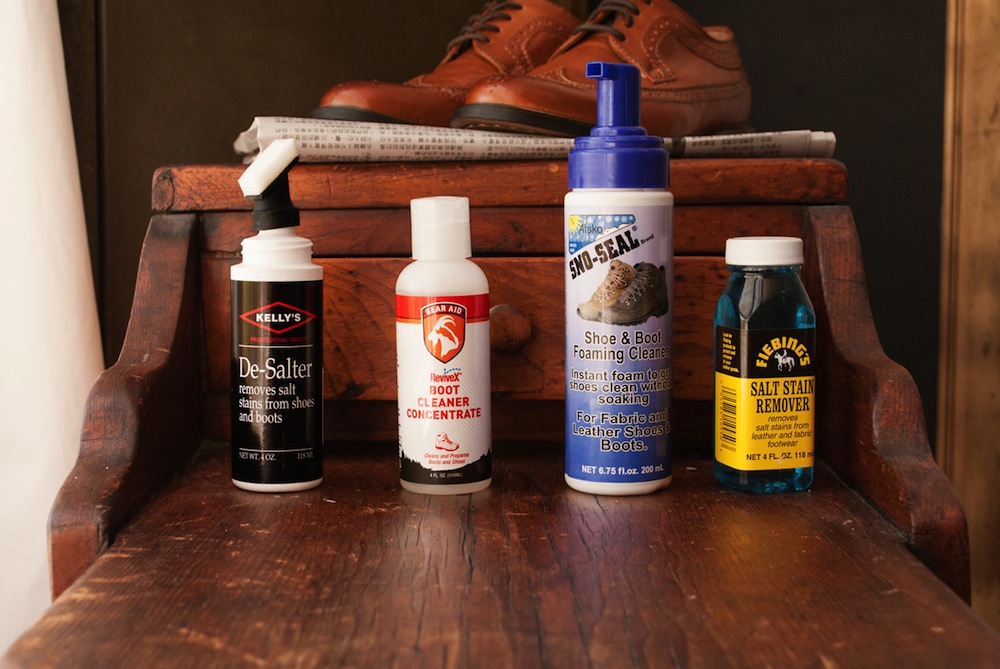
Kelly’s De-Salter – Fiebing’s, Revivex Boot Cleaner Concentrate – Gear Aid: Nubuck, Suede and Fabric Boot Care kit, Sno-Seal: Shoe and Boot Foaming Cleaner – Atsko, Salt Stain Remover – Fiebing’s, Shoes – Call It Spring
Step 2: Cleaning
Now that you have gotten all the dirt off of your shoes, it is time to clean material of the uppers themselves. Here in Canada (or anywhere else that gets mega cold), salt stains are often the last stubborn reminders of the frigid winters. Some DIY types tout the merits of a ⅔ water ⅓ vinegar solution for treating salt stains, however, if you’re in the market for a premium cleaning product, we recommend something a little more specialized. Kelly’s De-Salter or Feibings Salt Stain Remover are specifically engineered to neutralize ugly stains by dissolving the salt so it just rubs off.
Now that the salt stains have been taken care of, it’s time for a deep clean before conditioning. It is important to use a specialized leather cleaning product as opposed to a household soap; regular soaps and detergents tend to leave residue and clog the pores in your footwear. We recommend Atsko’s Sno-Seal Shoe & Boot Foaming Cleaner for leather uppers and Gear Aid’s Boot Cleaner Concentrate for suede. In both cases, the application is similar: dampen the surface of your shoe, work the foam or concentrate solution into the shoe upper with a soft brush or cloth (again paying special attention to the seams and stitching) and rinse gently with warm water.
After washing your shoes, it is very important to dry your shoes again before applying any conditioning oil/wax or waterproofing spray. If you apply a conditioner to your shoes while they are still wet, it will seal moisture inside the leather, so stuff them with paper leave them overnight to dry out again.
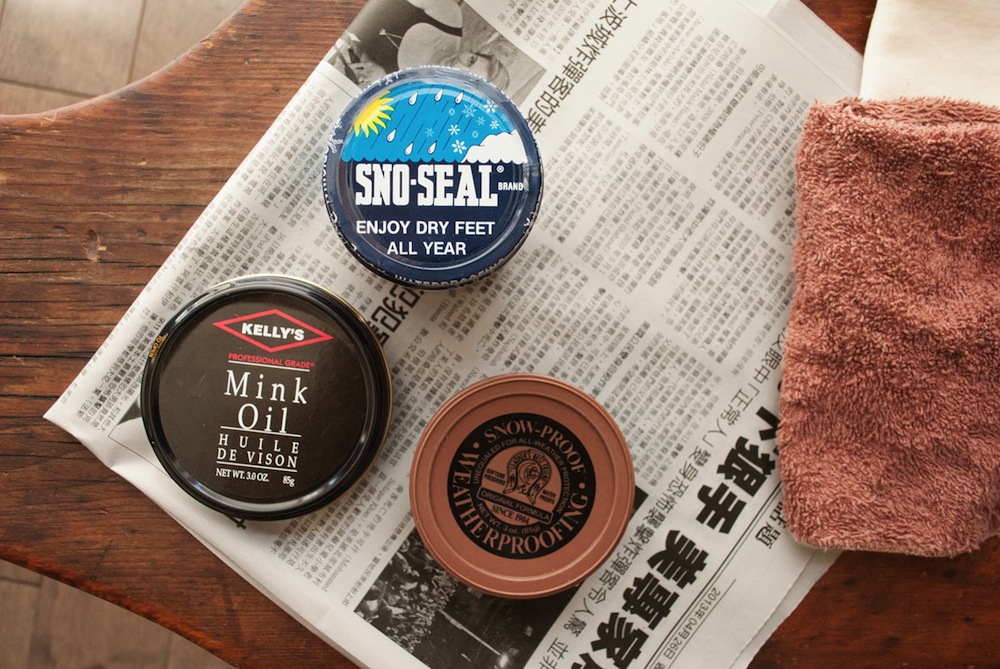 Sno-seal – Atsko, Snow-Proof – Fiebing’s, Kelly’s Mink-Oil – Fiebing’s
Step 3: Conditioning
Regular conditioning is vital for the dignified longevity of your leather shoes and boots. Conditioning the uppers will preserve the luster and patina of the leather itself and if done with care it will go along way to weatherproofing your footwear too. Mink oil and Beeswax are traditionally the base ingredients for these types of leather ointments. We have chosen Atsko’s Sno-Seal, Kellys Mink Oil and Fiebing’s Snow-Proof as especially effective treatments, but we have even seen everyday hand moisturizers used in a pinch (although this will hardly go the distance in terms of weather proofing).
The application of these products is where it gets fun: Line up your shoes by the window in the sun and let them get hot! In order to get the best application you will need to actually warm up the leather so that the wax and oil can penetrate the surface and be fully absorbed into the material. Using a soft clean cloth, apply an even layer of conditioning product and work it into the leather with firm circular movements. Treating your shoes like this will help soften and preserve the leather but it may darken the colour; test it on an inconspicuous spot such as the heel before going in for the whole shoe.
Always remember to consider the materials your shoes are made of; suede and nubuck are more susceptible to damage and so you will want to go for a spray on waterproofing product as opposed to a wax or oil as they will gum up the texture of the nappe. Instead of applying a conditioner to your suede shoes take this opportunity to rebrush the uppers and ensure that the nappe is consistent so that, when applied, a topical treatment will have an even surface to adhere to.
 Revivex Leather Gel and Water Repellant Conditioner – Gear Aid: Leather Boot Care Kit, Silicone Water-Guard – Atsko, Shoe & Boot Water Repellant – Atsko
Step 4: Waterproofing
If you’ve followed along this far your shoes should already be fairly weather resistant thanks to the conditioning step, but to make sure we have done a thorough job we have one final treatment – topical waterproofing. As opposed to the waterproofing derived from the conditioning agents we have just applied, these treatments create a thin (but substantial) seal to keep dirt and moisture out. Gear Aid offers a water repellant gel which you simply buff onto your clean, dry leather, as well as a spray on treatment for suede. Atsko offers a two levels of protection: for casual wear and athletic shoes, there is the Shoe and Boot Water Repellant and for more serious waterproofing there is the Silicone Water-Guard heavy duty water repellent. Because you don’t have to rub these into the leather, they are suitable for suedes and canvas as well as leather.
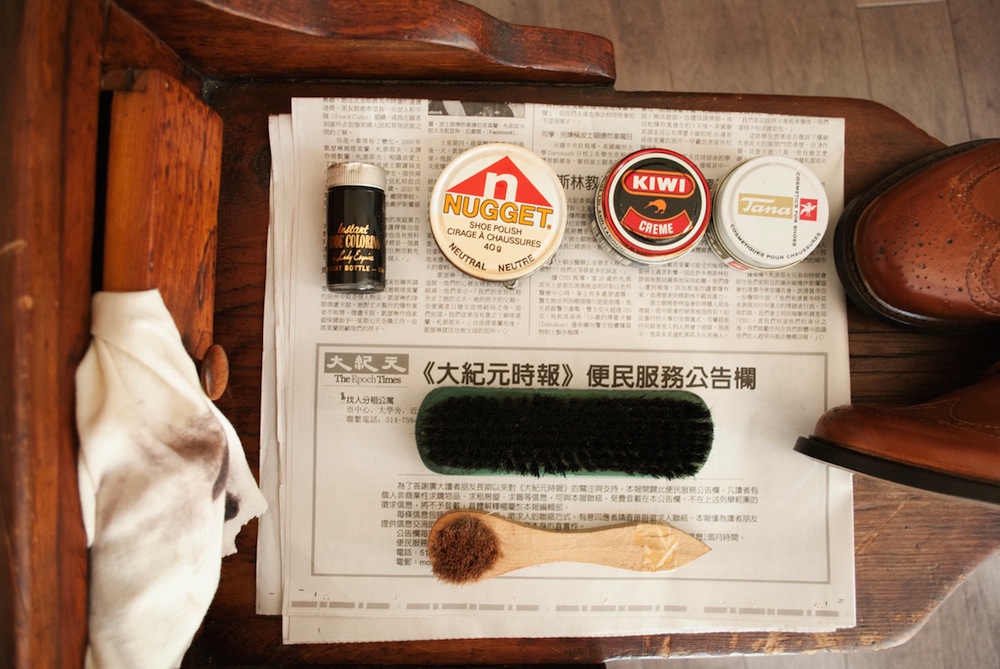 Shoe Polish – Nugget, Shoe Polish – Kiwi, Shoe Polish – Tana, Shoes – Call It Spring
Polish
Up to this point we have been dealing with regular maintenance and everyday care. The cleaners and conditioners we have just applied will bring out the natural colours of your leather, but we could go further still. Giving your shoes that gleaming sparkle of a fresh polish is a lesson for another day – check back with us soon for the WRG guide to shoe polish.
By regularly taking the time to treat and condition your shoes you will increase their longevity and performance while also keeping them looking their best. Waterproofing and conditioning your shoes will keep the leather supple and your feet feelin’ fine through spring showers to summer thunderstorms.
Taking proper care of your shoes is an important craft; shoe shine boys and cobblers once lined the corridors of great train stations and busy metropolitan streets, but no more. Like so many things: if you want something done right, you've got to do it yourself. We’ve found cleaners and conditioners, natural waxes and oils, synthetic waterproofing sprays and even some household items with little known alternative uses. We have assembled a whole range of the tools and products you will need to take care of everything from your sneakers to your premium leather and suede boots. There are few things as unpleasant as wet feet, so follow along as we run through four simple steps of basic shoe cleaning and care.
Magic Eraser - Mr. Clean, Revivex Suede Brush and Block - Gear Aid: Nubuck, Suede and Fabric Boot Care kit
Step 1: Remove debris and dirt.
Before even starting to clean your shoes, make sure they are thoroughly dried out. Stuff them with newspaper overnight to make sure they are bone dry and ready to accept all the nourishing conditioners we are about to apply. Once your shoes are dry, take out the laces so that you can get into all the creases and crevices. Begin to remove any surface dirt with a stiff brush; you will want to pay special attention to seams and stitching, these are the spots where mud and dust can work their way into the shoe and cause added wear and abrasion.
Mr. Clean Magic Erasers are ideal for athletic shoes (Jordans); believe it or not, they are crazy good for removing superficial stains and scuff marks from smooth leathers. If you're working on suede or nubuck, stick with a brush and block. Be sure to pay attention to the grain of the material (aka the nappe); for stubborn scuff marks and worn in dirt you will want to brush against the grain, to raise the nappe and release the offending dust and grime with the rubber suede block.
Kelly’s De-Salter - Fiebing’s, Revivex Boot Cleaner Concentrate - Gear Aid: Nubuck, Suede and Fabric Boot Care kit, Sno-Seal: Shoe and Boot Foaming Cleaner - Atsko, Salt Stain Remover - Fiebing’s, Shoes - Call It Spring
Step 2: Cleaning
Now that you have gotten all the dirt off of your shoes, it is time to clean material of the uppers themselves. Here in Canada (or anywhere else that gets mega cold), salt stains are often the last stubborn reminders of the frigid winters. Some DIY types tout the merits of a ⅔ water ⅓ vinegar solution for treating salt stains, however, if you’re in the market for a premium cleaning product, we recommend something a little more specialized. Kelly’s De-Salter or Feibings Salt Stain Remover are specifically engineered to neutralize ugly stains by dissolving the salt so it just rubs off.
Now that the salt stains have been taken care of, it’s time for a deep clean before conditioning. It is important to use a specialized leather cleaning product as opposed to a household soap; regular soaps and detergents tend to leave residue and clog the pores in your footwear. We recommend Atsko’s Sno-Seal Shoe & Boot Foaming Cleaner for leather uppers and Gear Aid’s Boot Cleaner Concentrate for suede. In both cases, the application is similar: dampen the surface of your shoe, work the foam or concentrate solution into the shoe upper with a soft brush or cloth (again paying special attention to the seams and stitching) and rinse gently with warm water.
After washing your shoes, it is very important to dry your shoes again before applying any conditioning oil/wax or waterproofing spray. If you apply a conditioner to your shoes while they are still wet, it will seal moisture inside the leather, so stuff them with paper leave them overnight to dry out again.
Sno-seal - Atsko, Snow-Proof - Fiebing’s, Kelly’s Mink-Oil - Fiebing’s
Step 3: Conditioning
Regular conditioning is vital for the dignified longevity of your leather shoes and boots. Conditioning the uppers will preserve the luster and patina of the leather itself and if done with care it will go along way to weatherproofing your footwear too. Mink oil and Beeswax are traditionally the base ingredients for these types of leather ointments. We have chosen Atsko’s Sno-Seal, Kellys Mink Oil and Fiebing’s Snow-Proof as especially effective treatments, but we have even seen everyday hand moisturizers used in a pinch (although this will hardly go the distance in terms of weather proofing).
The application of these products is where it gets fun: Line up your shoes by the window in the sun and let them get hot! In order to get the best application you will need to actually warm up the leather so that the wax and oil can penetrate the surface and be fully absorbed into the material. Using a soft clean cloth, apply an even layer of conditioning product and work it into the leather with firm circular movements. Treating your shoes like this will help soften and preserve the leather but it may darken the colour; test it on an inconspicuous spot such as the heel before going in for the whole shoe.
Always remember to consider the materials your shoes are made of; suede and nubuck are more susceptible to damage and so you will want to go for a spray on waterproofing product as opposed to a wax or oil as they will gum up the texture of the nappe. Instead of applying a conditioner to your suede shoes take this opportunity to rebrush the uppers and ensure that the nappe is consistent so that, when applied, a topical treatment will have an even surface to adhere to.
Revivex Leather Gel and Water Repellant Conditioner - Gear Aid: Leather Boot Care Kit, Silicone Water-Guard - Atsko, Shoe & Boot Water Repellant - Atsko
Step 4: Waterproofing
If you’ve followed along this far your shoes should already be fairly weather resistant thanks to the conditioning step, but to make sure we have done a thorough job we have one final treatment - topical waterproofing. As opposed to the waterproofing derived from the conditioning agents we have just applied, these treatments create a thin (but substantial) seal to keep dirt and moisture out. Gear Aid offers a water repellant gel which you simply buff onto your clean, dry leather, as well as a spray on treatment for suede. Atsko offers a two levels of protection: for casual wear and athletic shoes, there is the Shoe and Boot Water Repellant and for more serious waterproofing there is the Silicone Water-Guard heavy duty water repellent. Because you don't have to rub these into the leather, they are suitable for suedes and canvas as well as leather.
Shoe Polish - Nugget, Shoe Polish - Kiwi, Shoe Polish - Tana, Shoes - Call It Spring
Polish
Up to this point we have been dealing with regular maintenance and everyday care. The cleaners and conditioners we have just applied will bring out the natural colours of your leather, but we could go further still. Giving your shoes that gleaming sparkle of a fresh polish is a lesson for another day - check back with us soon for the WRG guide to shoe polish.
On Cover & throughout: Shoes - Call It Spring